Saturday, June 29, 2013

Discovery Science Center, R2's First Real Event

I took R2 to the Discovery Science Center in Santa Ana in CA for his first real event. I got there around 11:30 and went to our spot with Victor and Rico and their droids. Victor brought his R2D2 and Rico his R2X7. This is the first day of a two day event. Around 1 Victor gave a presentation about the builders and around 3 (just in time for the next presentation) Mike Senna joined us with his Wall-E.

I had plenty of kids poking and hitting poor R2 but more being nice and taking pictures. R2's re-painted bottom ring started to smear and I found out why after some research. The temperature and humidity makes the drying time a few days. Hopefully tomorrow the bottom ring gets left alone so I don't have about a dozen more smears of blue to fix on the silver sections.

 As I was leaving a guy asked "How are you single with a robot?!"


I put candy out for the kids


My R2D2 and Rico's R2X7

How my R2 looks now after week of work

Wall-E brought back the crowd quickly


After Victor talked about the R2 Builders Mike talked about Wall-E


R2 was really tired...or to quote a little kid "R2D2 is broken!"

Tuesday, June 25, 2013

Dome is Silver (still masked), Inner Skins Stapled On

R2 is coming along nicely even though I have limited ability with my sliced finger. I painted the silver parts of his dome silver and added the base of the HP's. I also wood puttied up the legs, sanded them, cut the frame to have the skins fit snug, and stapled the inner skins on this a staple gun. Not too many pics because I've been busy and ouching (typing this is hard) but here are some.

R2 is finally coming together and looking like a droid. Almost ready for the event this weekend.


Saturday, June 22, 2013

R2's First Blood

So...it was late (midnight) and I couldn't sleep and went to work in R2 since that tires me out. I was cutting styrene skins when the utility knife slipped and sliced me. I went to the doctor ASAP since its just kinda oozing blood not gushing or anything 911 worthy.

 Not too bad of a picture for any weak stomachs here. This was about 15min after the incident and ipod quality.


All bandaged up but as of now (19 hrs later) its oozing and scabbing.


The bleeding was good enough to get blood on R2, the carpet, my hall tile, the bathroom tile, the toilet, and me of course. Typing this was hard and painful. There are 3 drops on R2's leg and more drips on the skins. NEW SKINS! Thankfully those are the inner skins. I should be ok for next weekends event, R2's first real event since he starter looking like a droid.


Friday, June 21, 2013

Put Inner Chani Skins on R2

I struggled to get R2 into his new inner skins, he's like a little kid who doesn't want to get dressed. I used up my duct tape and got some clips to hold thing together. I'll be going shopping at home depot next week for screws and/or liquid nails to attach the skins.

Bad iPod quality...sorry they're all dark


Thursday, June 20, 2013

Pianted Radar Eye, put lights in dome

I took advantage of my free time and painted my radar eye blue.


I also put a light in the front circle thing on my dome and put plastic strips in the other logic holes. My dome's blue panels are almost cured and I'll be adding silver soon. I also received skins from Cody Wiles today.


Tuesday, June 18, 2013

On the u-bolt and tall rail....

The rail attached to the pipe keeps the body at the correct angle. I got a u-bolt from Victor, used the second hole on the far side as a guide to put hole in the tall rail, and got a longer bolt to go through both rails. The u-bolt goes on the pipe. You also need to drill holes for the u-bolt to slide into that tall rail. Hope this helps a bit and if not Victor and/or Mike could explain better than me.

Monday, June 17, 2013

Center Ankle revisited

I've been getting questions about how I did my center ankle. I used rails like these to hold them on but that's later...

I can try explaining mine but I'm kinda bad at it. I went off of Victor Franco's method (Mike Senna's plans/blueprints). Basically make a wooden leg (3 layers of 1/2 wood ) only like 12-14 inches tall and not the top part of the leg. Your center ankle should look like this...
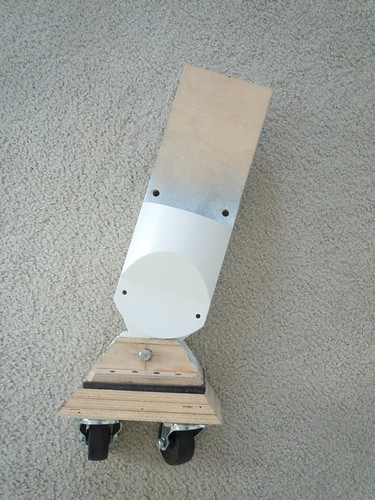
this is Victor's

never mind the center caster holder. Ask Victor Franco how he did his because I didn't follow his method. I took 2 thick pieces of wood and glued them together and then bolted the wheels on...this is victor's...
http://farm1.static.flickr.com/213/4...f35d63.jpg?v=0
  
If you haven't made wood legs before here are the plans (leg assembly or leg outer? Don't remember which one). Also look at this for a tutorial on how to make the legs http://pw2.netcom.com/~artoodetoo/LegTutorial.pdf . Do this but only make the bottom half of the leg. Ask in the threads for the official blueprints because I haven't found them . Victor lent me his MDF leg to trace. ZHunter sold me full sized blueprints so maybe he can point you to the official blueprints.

For putting the ankle in the body you need rails like these...they need to be strong but also the right length (around 5-6 inches long depending on how long that metal plate in the com frame is and if you can drill holes in it)....
 
with a hole at each end so they can be bolted onto the frame and 2 on each other side so longer bolts can go through the center ankle and hold it there. This is mine...if you notice how the rail and bolts are on mine...  


Pictures are all squished again :(

I got the rails from Mike Senna

Hope this helps a bit. I only know Senna wood frame so I'm not sure how this would translate to others. Others might have to shorten the center ankle to have it not hit anything in other frmaes. Victor does this better and I based mine on his. I'm still kind of a newbie and had to let Roy Powers and Victor put my center ankle in . PM Victor Franco about this for more detail because I just kinda bought bolts and such and watched. Didn't trust myself with a drill press yet. Sorry if this is confusing or a bad explanation.


Unmasked Dome (blue)

I unmasked the dome today and saw the blue parts turned out well. They were perfect except for some drips and so on. I have blue paint to clean up the edges and some removal stuff as well. Not bad for my first time painting anything that isn't a cheap bird house with washable paints.

Letting it cure for 6-8 days or so then adding silver. Sorry for squished photos again, blogger offers no way to fix them and I haven't found a good solution yet.


Saturday, June 15, 2013

Painted dome with good to mixed results

I got a chance to paint the blue section of my dome using gloss blue paint (hopefully this is a good color) I finished masking lats night. I also cut of some panels (space for HP's and lights) with a stencil burner. The holes have rough edges since I haven't got the steadiest hand and haven't use something like this before. Add a week of party planning/setting up stress and working at 10pm because I couldn't sleep and you've got grade b work. I'm going to sand the edges later or find my X-acto knife and slice the scrapy things off.

So far so good with color and panel accuracy. Rough edges not so much. Hopefully no paint seeped under the tape.

before it was painted
first layer
all painted. waiting 24hr to dry and 5-7 days to cure

little bubbles/dumpy things in the paint. 
Hopefully not dirt. Might have to sand and repaint

Friday, June 14, 2013

R2 and I graduated!!!

 I graduated HS on Wednesday but unfortunately R2 couldn't come :(. I had a grad party and dressed R2 for the occasion. Class of 2013.

I also got R2's dome half masked and all I need to do now is finish masking the dome and paint. 

r2 with a beach ball


bowtie for R2

with the diploma

the dome half masked with tape for blue paint

with my friend Justine

R2 in his outfit with a balloon by me